Reflection
how does my final video relate to my artists demographic?
AJ traceys demographic is the younger audiences between 16-35. he targets the younger audiences as they are more likely to get influenced by the lifestyle as well as he lyrically explains his life which fascinates most of the younger audiences. the rich and overly hyped lifestyle is clearly shown in my final cut with the cutaways and the general structure of the music video. my demographic shows the relation to aj traceys demographic as well as having a unique aspect which is the narrative.
Tutorial 1: During todays lesson i edited a piece of visuals and music together to fit the music beat to the change in angles and shots. This tutorial was very straight forward and easy to understand its simply mark the beat (peaks) in the music audio and then cut and align the visuals with the audio. i think i could have edited more to increase the pace of the visuals with the pace of the beat. i think this is a very useful tutorial as it stays sync through out the video making it look and sound clean and better with more potential of the music getting recognised with using this technique, as doing any alternative method would be complex and possibly not work out.
Tutorial 2: This is a more advanced tutorial as its getting into the looks of the video. for this tutorial I decreased the background saturation to black and white to make a focus colour which was red in this video. this is a really useful method to bring a single colour out. colours have a very important part in nearly everything from fast food logo to emotions people feel. this could be seen through the understanding of the colours such as red could be used to show passion, love, blood, murder, demons, etc. This method really allows these emotions to be shown or create some sort of symbolism. I could use this in my final outcome depending on the emotions or symbolism I'm trying to create within however necessarily it wouldn't be useful for me to use it while trying to entertain of if I'm using lots of different effects.
Tutorial 3: colour hype tutorial was very simple yet very vibrant and creative. This tutorial was very simple with only a few quick and clear steps and the rest was to play around and see the different outcomes of changes in the setting. this tutorial alters the colour in the video making a trippy more colourful visual effect. this is considerable with in my final outcome however I'm looking into more complexity in my effects however this is a very useful effect to have inputted some where within.
Tutorial 4: This tutorial is a very quick colour altering tutorial. we used the solarize effect on a given visual and altered the exposure. what i realised was i could edit where i want this effect to go on the visuals which i felt was very useful as its not an effect held through out.
Tutorial 5: This tutorial was very complex however it was easy once you got into it. you had to make sure the music was sync correctly with the visuals which was not as difficult as we used a sync setting with the rough cut audio and the original audio. the tutorial also consisted of up syncing different camera angles at once.
Tutorial 6: this was a practice recreational video. For this task we worked ingroups planning, directing, acting, recording to make a rough video. we chose a plugged in music video which is simply a video live performed.
Tutorial 7: This was a multi camera tutorial editing multiple camera shots together to create one almost perfect shot. We worked ingroups to create this and finalising with checks of the video being well synced and really bring out the main purpose of the tutorial which was different angles.
Tutorial 8- split screen editing: This tutorial was a new experience as it looked very complicated however it was actually very simple. For this we used a crop effect and had a load of scaling and cropping to do which was the simplest thing yet. we then used the feathering tool/settings to make the line splitting the clips more smoother and make it look more appealing and natural.
Lyrical video: This tutorial was creating a lyrical video which is simply a music video with no visuals. For the tutorial we needed a audio music and to create a colour matte item as a background the rest was very straight forward choose a font and size and add the lyrics in sync with the audio.
Tutorial 9: This is a monochrome tutorial. For this tutorial i got clips from pexels and combined them into premiere pro and added the monochrome punch effect as i experimented with the other monochrome effects yet didn't get the effect that i thought fits perfectly however this one brought out the best monochromatic experience.
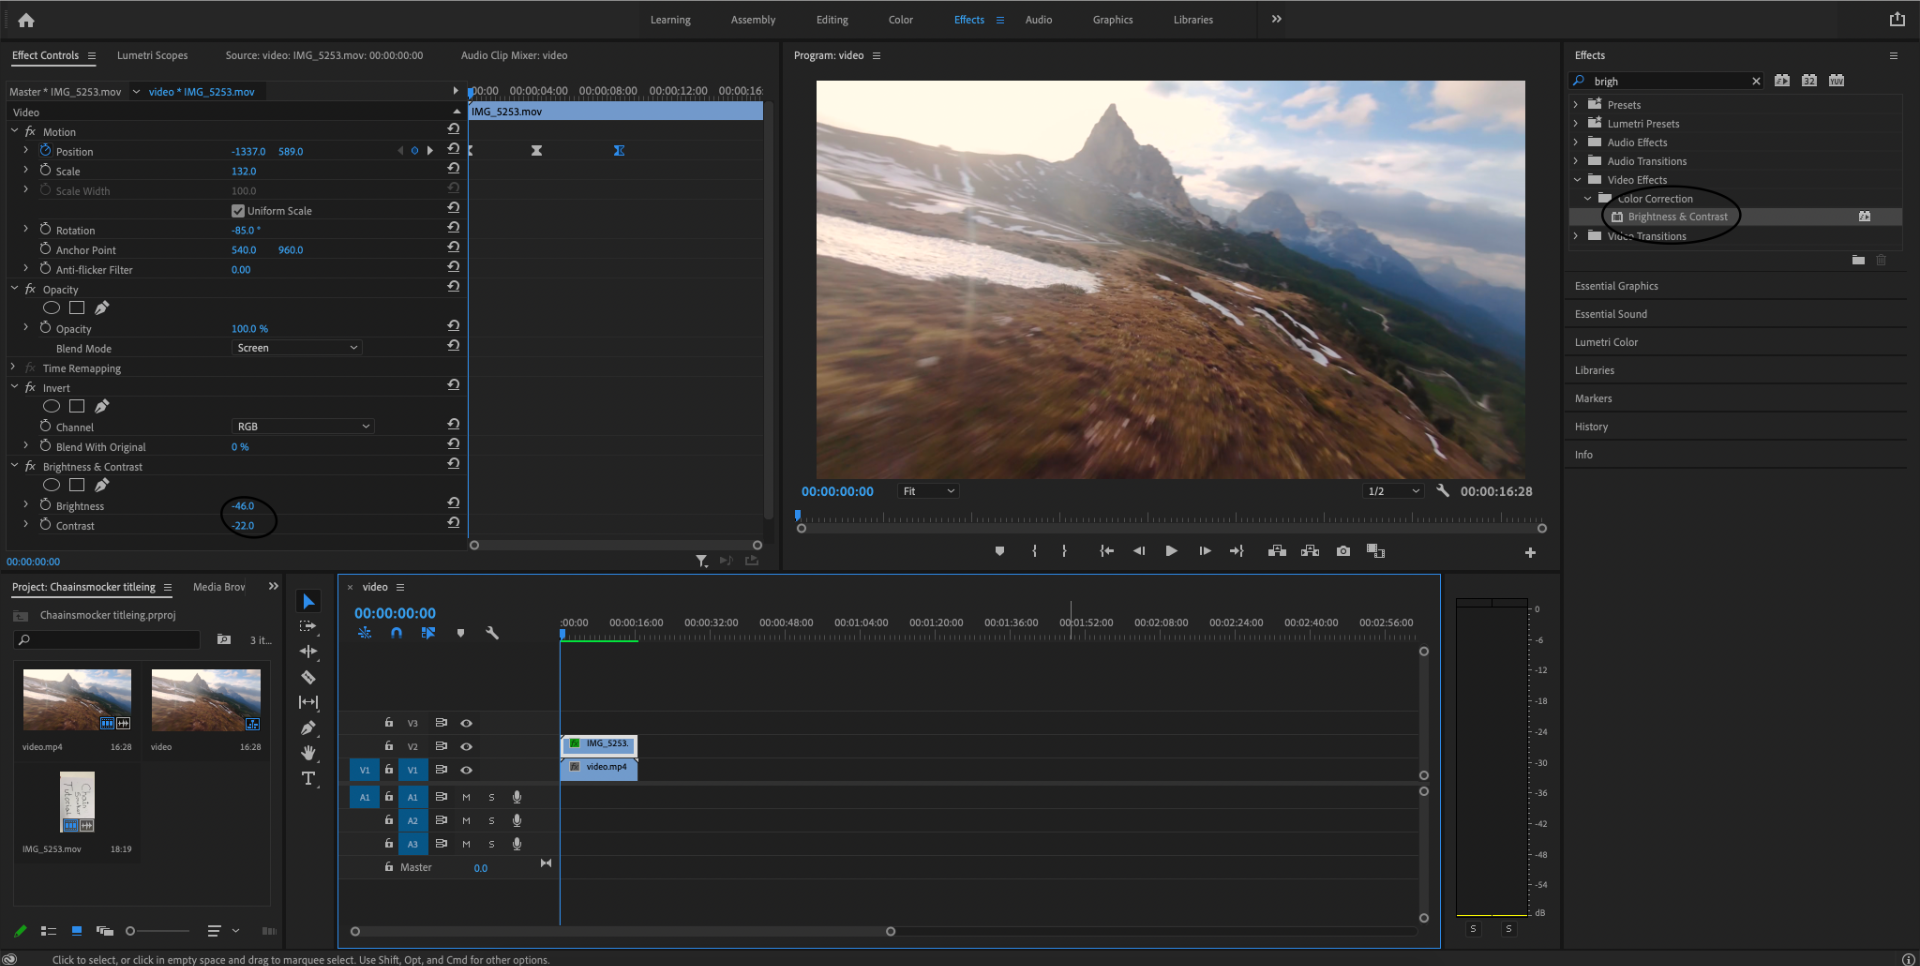
Tutorial 10: chainsmoker style text. this is a very artistic style and unique and different from any text style i've yet done we used two effects within this tutorial and hand drawn our text. to begin with put a drone shot clip on the timeline and then draw out your text using a marker of paint brush for more artistic effect. record the text and add it to the timeline and then add the invert effect to the text. using the effects control turn down the background brightness and then add the next effect brightness and contrast. play around with the controls and set it to a qualitative standard. the brightness and contrast alters the light within making the text slightly brighter.

Tutorial 11: This is a mirror effect tutorial and by far on of the quickest tutorials. simply grab a video of choice then open after affects and then add the mirror effect to the video then alter the centre of the mirroring effect. thats it however i had to scale and export on to premiere pro as i couldn't get the export to work.
Tutorial 12: cc light ray is a spot edit as it simply adds a bright reflective light on the point and you can move this where ever you prefer. we used after affects for this and the effect was cc light rays. This was a simple tutorial mainly consisting of moving the point of light around the subject and maybe changing the position.
Storyboard practice: https://www.canva.com/design/DAEsmHCVBgc/I9S3Z3EskY-rPK_rSULfLw/watch?utm_content=DAEsmHCVBgc&utm_campaign=designshare&utm_medium=link&utm_source=publishsharelink . Created a practice storyboard using a new and more advanced site canvas. I chose DBE Kevin McCallister for the story board and managed to structure in some shots showing the different camera angles used.
Frame rate: We worked in groups and participated in creating different clips with different FPS. We used the Nikon camera and changed the settings we got a mix of 24, 25, 50FPS. The more the frame per second the more smooth and clear the visuals look the less the FPS is the more the visuals will lag or cut of making a very unprofessional clip.
Tutorial 14: Glow tutorial is a neon glow tutorial which was created using the brush tool and time. Each frame was solo created first we grabbed the brush tool changed the size and colour then changed the frame from constant to single frame. carefully we moved from by from outlining the effect path finally it was completed successfully however the effect is extreamly fast which meant the for the effect to continue you had to make more outlines.
Line tracing glow tutorial is similar to the glow tutorial however its more focused on the object and requires less time. it is a neon glow effect that goes in a straight line around the object used on straight lined objects such as tables, roads, curbs tiles, walls, etc.
Trippy Tutorial- for this tutorial i used two effects cc wide time which created this layer effect duplicating in a slightly different colour i changed the setting bring the trippy effect to a more clearer view. the next effect is posterize time which basically increases and decreases the frame size for this i kept the settings on 140.6 which for me was giving a decent effect.
green screen basics: for this we need two clips one for the front and one for the background. using the ultra key effect and the pipet tool in the effects control click on the green screen bringing the background forward and then using the controls add smoothness etc. to get the green out of the main subject.